UPDATE September 19, 2015: Want to learn how to carve pumpkins like these? I’m creating a set of step-by-step video tutorials. Check out Carve Awesome Pumpkins for more info!
~~~
Welcome to Part 6 of my pumpkin carving series. If you missed any of the previous posts:
My Pumpkin Carving Process
This week I thought I’d show you some in-progress pictures of my Hunger Games pumpkin (pattern by Stoneykins) and talk about the process I used to carve it. Unfortunately, I wasn’t so good about taking pictures of every step along the way, but hopefully it’s enough to get the idea across.
Everything I’ve learned about pumpkin carving — especially foam pumpkins — has come from Stoneykins.com. He’s got really great tutorials on his site, as well as a forum full of very helpful, responsive carvers. If you want to learn how to carve pumpkins or learn how to carve better, that’s the place to learn!
Step 1: The Pattern
The first step in carving a great pumpkin is to have a great pattern. There are so many patterns available on the web, or you can make your own. Whichever way you go, make sure you print out an extra copy for reference!
If it’s a simple pattern that is cut-outs only, I usually just tape it on. But for patterns with shading, I use washable glue and let it dry overnight. If you try to carve when the glue is still wet, you will make a mess. If you use glue, make sure you spread the glue across the entire pattern. Any piece that doesn’t have glue will fall off the pumpkin as you carve and that won’t be good.
The first thing you’ll notice when gluing or taping the pattern on is that you’ll need to fit a flat piece of paper onto a curved surface. Trim the paper to 1/2″ to 1″ from the pattern. Start by sticking the middle of the top and bottom to the pumpkin. Then do the middle of the left and right.
Then work your way around the pattern, folding and tucking the pattern as necessary to make it lay flat against the pumpkin. Try to make the folds where they won’t affect the pattern, but that’s not always possible. Try to avoid altering any detailed parts of the pattern.
The pumpkin is not just round, it also has ridges. Use your finger to get the pattern down in those grooves so the paper sticks to the pumpkin. Remember, any part that isn’t stuck down to the pumpkin could fall off as you carve.
Unfortunately, I didn’t take any pictures of this step, but you’ll see the pattern glued to the pumpkin in the following photos.
Step 2: The Cut-Out Parts
I usually start with the cut-out parts. Those are the black areas on the pattern. For the Hunger Games pumpkin, because it was so intricate, I used a process recommended on Stoneykins that I don’t usually do.
I used an exacto knife to cut out the black parts of the pattern. I’m just cutting the paper here, not carving the pumpkin. Here’s what the pumpkin looked like after this step:

You’ll see I left some of the smaller areas uncut. Mostly because of my impatience. 😛
The point of using an exacto knife is so that the cuts come out cleaner. When you cut through the paper with the dremel, the paper shreds on the edges, and you could lose some of the details on the surrounding parts of the pattern.
This is the first time I’ve done this step. It does make for cleaner cuts, but for me, I wouldn’t spend the time doing this on a pattern that wasn’t as intricate. My Dumbledore pumpkin, for example, came out just fine and I didn’t take the time to do this step.
Once you’ve exacto’d off the black parts of the pattern, you cut out the places where you see pumpkin. I use a dremel with a 1/32″ drill bit. (I buy them in bulk from this ebay seller — they are tiny and break easily.)
Here is the pumpkin after all those sections have been cut out. The picture is already starting to come to life, but you can see how the shading will add so much more depth:

Step 3: Shading, Round 1
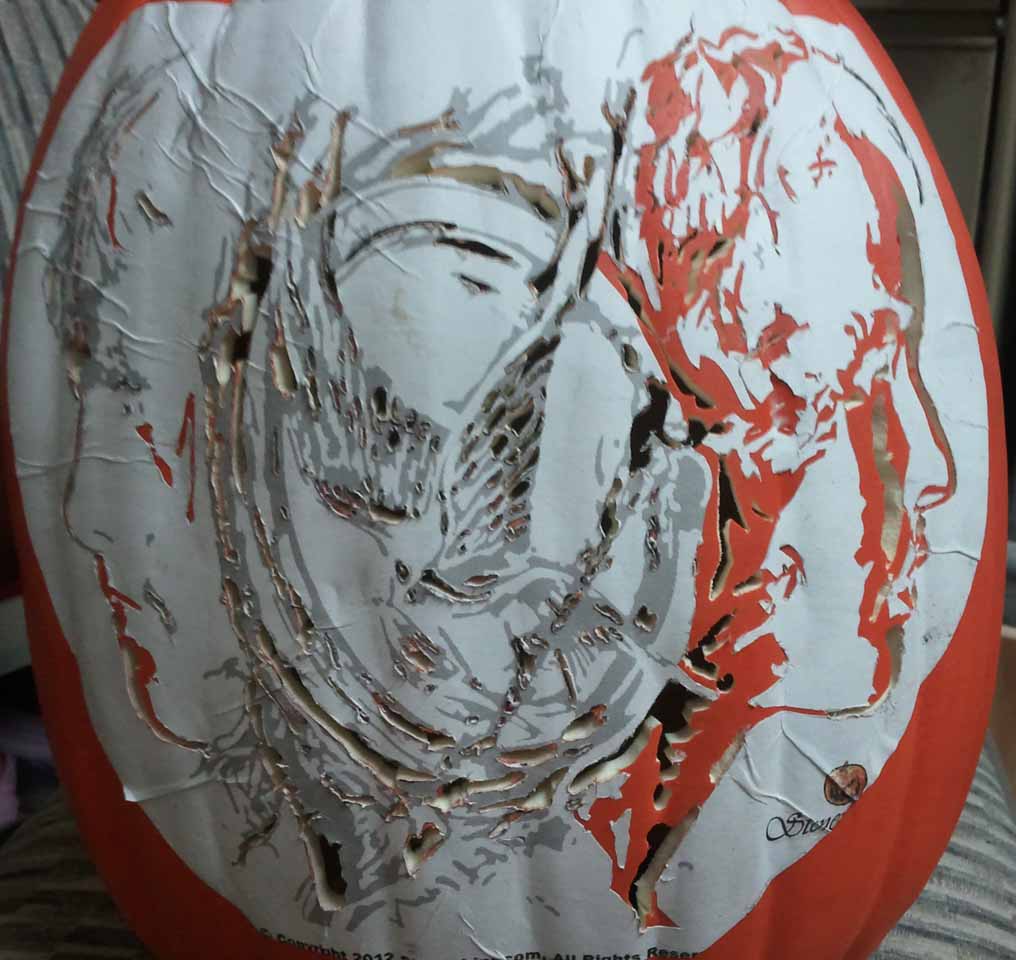
Once all the cut-out parts are done, I start on the shading which is marked on the pattern with gray. Again for this pattern, I used an exacto knife to cut away the pattern. To keep myself from getting bored, I did it in sections at a time, starting with Katniss.
Here you can see all the cut out sections have been cut out, and the Katniss side of the pumpkin has had the gray areas cut away with an exacto knife:

There’s a variety of dremel bits that you can use to do the shading. For the first pass, I usually use an engraving bit, either 105, 106, or 107, depending on the size of the area I’m shading.

At this point in the process, I’m looking to get the orange paint off and dig into the foam a little bit. You want to go fairly deep — but not all the way through, obviously — so that the shading is effective. It will look uneven and messy right now, that’s OK.
After the first pass with the engraving bit, I go over any spots that need to be shaded deeper with diamond burr bits:
-w~~60_57")
Here’s what the Katniss side looked like after my first pass of shading. You can see that it’s not smooth and even.

After doing Katniss, I went back and exacto’ed the rest of the pattern. With a smaller pattern, I would have done all the exacto’ing at once and then all the shading.
Here you can see the rest of the gray parts have been cut out, and you can see the yellow foam on the Katniss section where I’ve already done the shading:

And here is after the first round of shading has been done over the whole pumpkin:

Step 4: Removing the Pattern
At this point, I light up the pumpkin to make sure I haven’t missed anything. After this step, the pattern will be gone, so make sure you’ve gotten everything.
Run warm water over the pumpkin to wash out the glue. The pattern will come off fairly easily, just be gentle with your carving in case you have delicate parts.
You’ll need to let your pumpkin dry before you continue. Sorry.
Step 5: Smoothing (Shading, Round 2)
The fifth and final step is to smooth out the shading you did in step 3 to make it look spectacular. 🙂
For this part, I use small sanding stone bits like these:

For very small sections, I’ll use the smaller diamond burrs to smooth.
Taking Photos of Pumpkins
Sometimes taking good photos of the pumpkins is the hardest part! I took over 50 photos of the finished Hunger Games pumpkin, using various camera settings, to get the one I liked the best.


You can see by comparing these two photos what a difference it can make. I believe the setting I used on the bottom photo was my camera’s “low light” setting. Getting the orange coloring was important for this pattern to make the Mockingjay look like it was on fire. The only processing done to this photo in Photoshop was to crop it and add the watermark. And I have a point-and-shoot camera, not a fancy one. I wouldn’t even know how to use a DSLR camera.
Experiment with your camera’s settings, and the amount of light in the room. The amount of light in the pumpkin can make a difference, too. Each carve is different.
The Vampire Diaries Patterns
These patterns weren’t available when I did Part 2, YA Themed Pumpkins, but I’ve since updated that post.
Ultimate Pumpkin Stencils has added Vampire Diaries patterns to their store:

Friday night, I carved the Damon pumpkin:

It was a nice, easy carve compared to the Hunger Games pumpkin. 🙂
People ask me how long it takes to carve, but I never time myself. A large part of that is because I don’t do it all in one sitting. But I was able to do the Damon pumpkin in one sitting. It’s a fairly simply carve, cut outs only. I used a hot knife instead of the dremel, which takes a little longer but gives cleaner cuts.
From taping the pattern on to lighting up the finished pumpkin took 25 minutes. The Hunger Games pumpkin, in contrast, took many sessions over several days.
Next week is my final post in my pumpkin carving series. I’ll be showing off all the pumpkins I’ve carved this year, which is not nearly as many as I’d hoped to do.


-w~~60_57")


