I Was Featured on People Magazine’s Website!

UPDATE September 19, 2015: Want to learn how to carve pumpkins like these? I’m creating a set of step-by-step video tutorials. Check out Carve Awesome Pumpkins for more info!

~~~

Okay, my pumpkin  was featured on People Magazine’s website. But that’s still super cool!

peoplemag


My Hunger Games pumpkin was carved using a pattern from Stoneykins.

More Free Pumpkin Carving Patterns, Including Minecraft

UPDATE September 19, 2015: Want to learn how to carve pumpkins like these? I’m creating a set of step-by-step video tutorials. Check out Carve Awesome Pumpkins for more info!

~~~

I added a couple of new pumpkin carving patterns on the FREEBIES page:

  • Minecraft Steve (2 variations)
  • Eleanor and Park
  • The Coldest Girl in Coldtown (2 variations)

Minecraft Steven -- Pattern 1Minecraft Steve -- Pattern 21377045_10100653641773685_173037581_nThe Coldest Girl in Coldtown MOCKcoldestgirlMOCK2

How to Keep Your Pumpkins Looking Fresh Longer

UPDATE September 19, 2015: Want to learn how to carve pumpkins like these? I’m creating a set of step-by-step video tutorials. Check out Carve Awesome Pumpkins for more info!

~~~

In the past, I’ve done all or most of my pumpkin carving on Halloween. Anyone who’s carved a pumpkin knows that it doesn’t take long before it starts to dry out and shrivel, distorting the image. Finally, I’ve found an easy way to preserve my pumpkins and keep them looking fresh longer, allowing me to carve ahead of time.

I learned this tip on the Stoneykins.com forum. You have you any questions about pumpkin carving, that is THE place to go. The folks there are knowledgeable, helpful, and just plain fun!

Last night, before I went to bed, I filled a large Rubbermaid bin with water and added some bleach. I didn’t measure, just poured a little bit in.  I put in my carved pumpkin and left it there overnight.

This morning, my pumpkin looked just as fresh as it did when I finished carving it! The only difference was the bleach turned whitened the shaved flesh a bit. A small trade-off for keeping the pumpkin looking fresh.

Minnie Mouse pumpkin after bleach bath


For more tips about pumpkin carving:

Tools For Carving Better Pumpkins

UPDATE September 19, 2015: Want to learn how to carve pumpkins? I’m creating a set of step-by-step video tutorials. Check out Carve Awesome Pumpkins for more info!

~~~

Hard to believe it’s October already! It’s time to start carving pumpkins, if you haven’t already!  Because I like to carve foam pumpkins I can display year after year, I start carving in September or earlier. The foam pumpkins require a different carving process than real pumpkins.  Check out these tips and gather your supplies!

This year, I added a new toy:

MOTO TOOL FOOT PEDAL for power tools

This allows me to not only turn my dremel on and off with my foot, but also control the speed. Now I can keep a hand on my pumpkin while turning the dremel on or off!

The main reason I picked up a foot pedal for the dremel was so that I could finally use the flex shaft attachment:

But before I can use the flex shaft attachment, I need a place to hang the dremel. When you use the flex shaft attachment, the dremel must be located above you for it to work properly. Earlier this spring, we replaced our deck with a patio, so now I carve outside. (Makes for much easier clean up!)  But, there’s nothing above me to hang the dremel on.

I’m going to have my husband help me build a stand to hang the dremel on, much like this one, only taller:
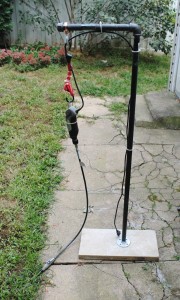
Dremel Stand

You can find the instructions on how to build your own on the forum at Stoneykins.com.

Speaking of Stoneykins.com, don’t forget about this coupon:

stoneykins coupon pumpkin carving patterns

For more info about getting starting with pumpkin carving, see:

Happy Carving!

Amazon links are affiliate links